
This Lab Note contains instructions for setting up the new PayPal interface in Seamless Donations version 5.2.0 and later. Be sure to read the guidelines below.
A lot has been going on behind the scenes. Since early 2022, I’ve been working with the development team at PayPal to implement a fully supported, modern PayPal Checkout interface.
This is huge. It’s also taken a ton of work, probably 20 meetings, a whole lot of helpful interaction with the folks at PayPal, and even an implementation review by PayPal before this update could be published.
No more IPN
The single biggest change is that the hugely troublesome IPN mechanism is gone. You no longer have to worry about round-tripping to PayPal and back for donations to register. Seamless Donations just reaches out to PayPal, registers your donation, and that’s it. You can actually be behind a firewall that doesn’t allow incoming web connections and it will still work.
For those of you relying on IPNs for current repeating donations, that will still work — at least as much as it worked for all these years. PayPal is obsoleting that mechanism, so there won’t be updates for it (and very limited tech support). But your existing donations should still keep coming through.
You can switch to the PayPal Checkout mode and still get your older IPN repeating donations — at least for as long as that mechanism still works with PayPal.
New settings
The second big change is that you’ll need to enter in new settings for the new PayPal interface to work. Let’s look at what’s involved.
Choose your payment processing system
The payment processing selector on the Settings tab has changed. For new Seamless Donations users, you now have the choice of PayPal Checkout and Stripe. For existing Seamless Donations users, you’ll also have the PayPal Legacy option, which is the option you’ve been using all along. Existing users won’t be moved off of PayPal Legacy, but be aware that support for it is going away both at PayPal and in Seamless Donations, so you’ll want to consider migrating to PayPal Checkout.

To move to the new PayPal Checkout processing system, choose PayPal Checkout and click the Save Basic Settings button.
Note: At this time, you must choose between PayPal and Stripe. You can’t run both. PayPal Checkout does handle credit card processing in this new implementation, so that might help with your decision.
Configuring your PayPal settings
Just below the Basic Settings section is the new PayPal Checkout Settings block:
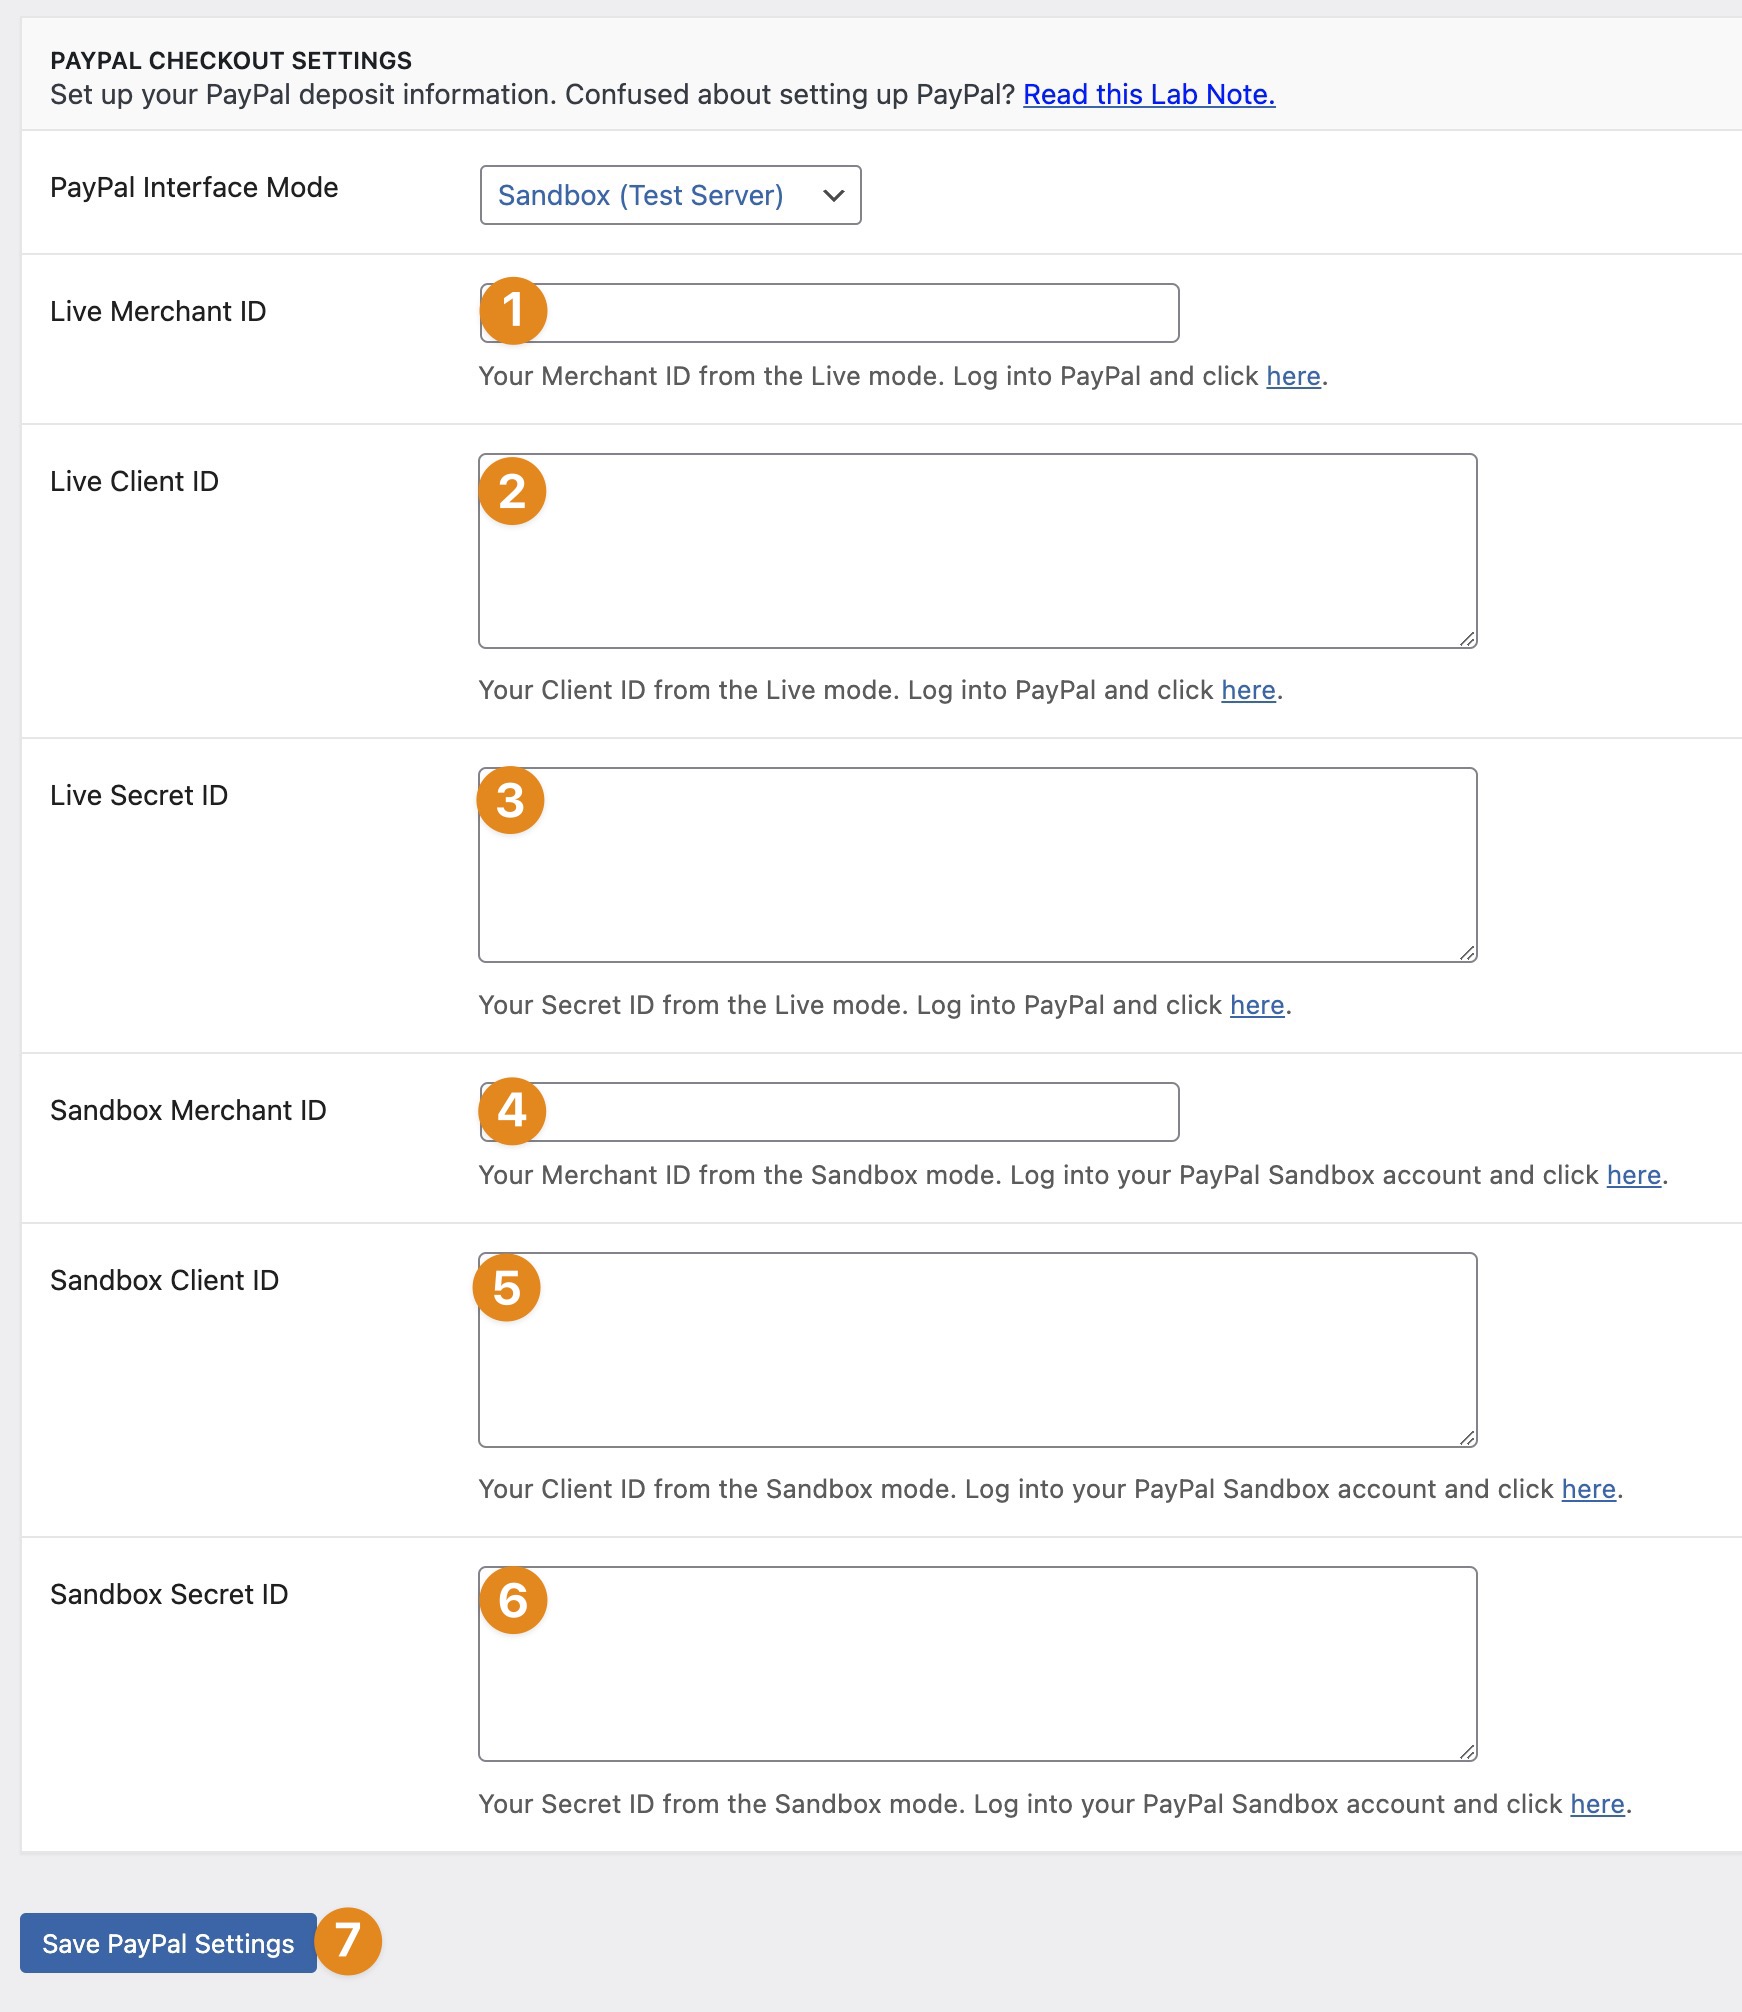
The key to configuring this is to fill in the Live IDs (indicated as 1, 2, and 3 above) and the Sandbox IDs (indicated as (4, 5, and 6 above). You can choose between Sandbox and Live mode at the very top. I recommend testing in Sandbox, then switching to Live mode.
But first, let’s get those IDs you’re going to need.
Getting your Live and Sandbox merchant IDs
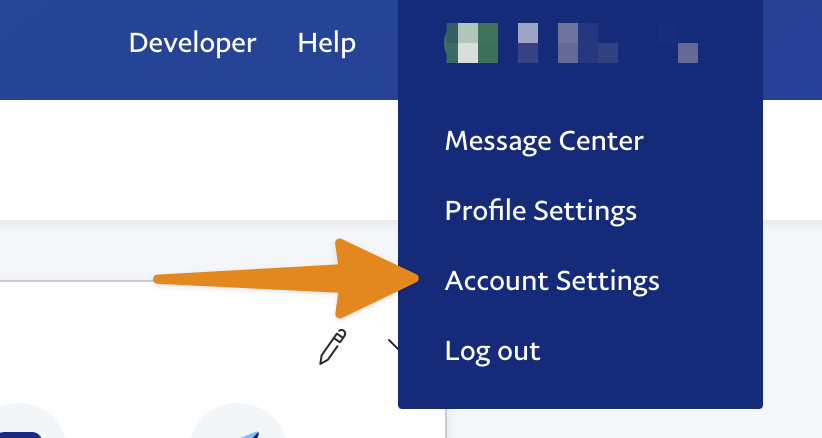
Let’s start with getting your Live merchant ID. First, log into your Live PayPal dashboard. Remember, this dashboard controls real money, so be careful. At the upper right of your screen is your login menu. Click it and then click Account Settings:
You’ll see this page:
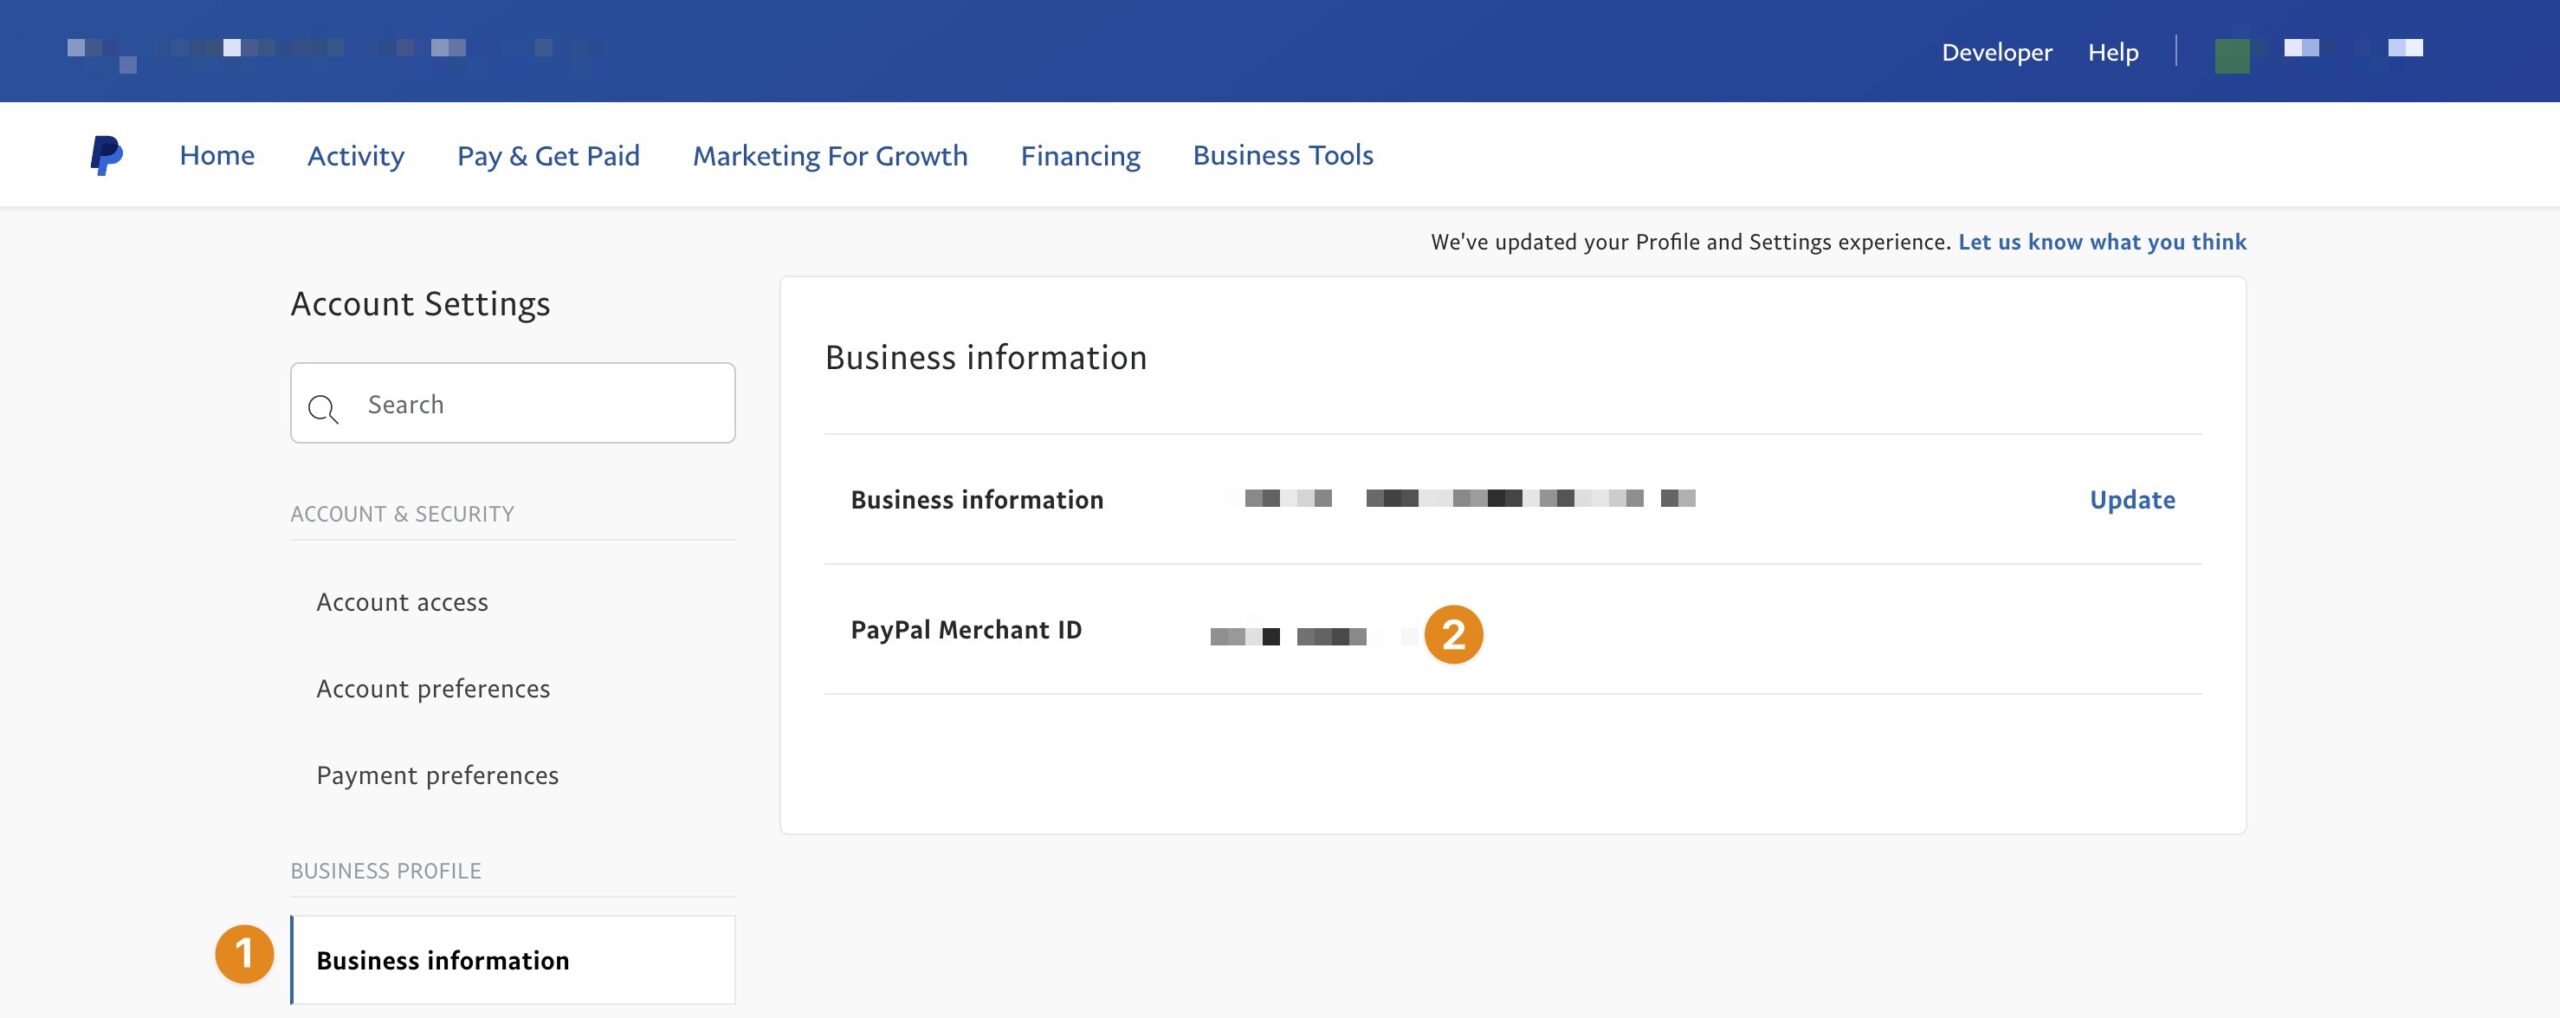
First, click the Business Information tab at (1). Then copy your PayPal Merchant ID at (2). Preserve this carefully. You’ll use this in your Seamless Donations settings. Refer back up to the PayPal Checkout Settings graphic above. The Live Merchant ID goes into the field marked as (1).
Remember this interface. Once you’ve created a Sandbox account, you’ll log into your Sandbox account and navigate to Merchant ID. That’ll be later, so don’t worry about it yet.
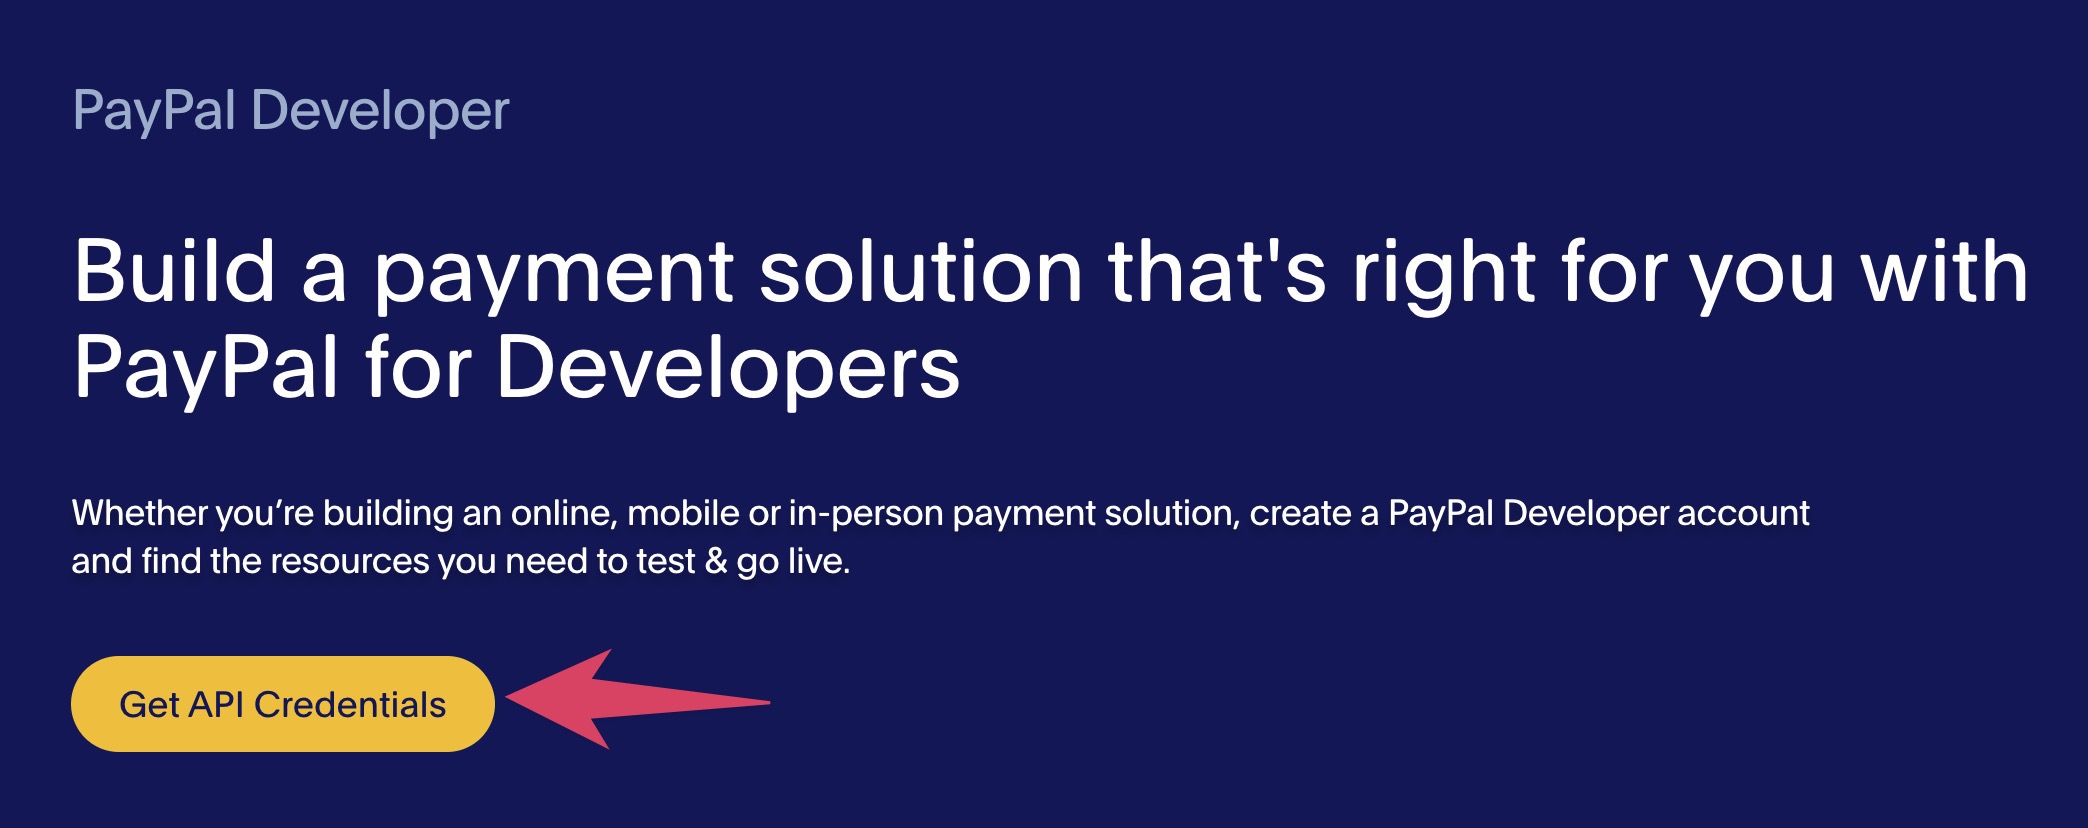
Getting your IDs from PayPal
Point your browser to PayPal’s Developer site. You’ll see this screen. Click Get API Credentials.
You’ll be asked to log into PayPal. Make sure you login with the account you want to receive donations. Once you complete the login, you’ll be on the developer dashboard:

There are three things to notice. At (1), notice that we’re in Sandbox mode. If you’re in Live mode, you won’t see that indicator. You can switch between Live and Sandbox mode with the toggle button (2). You’ll need to get app credentials to paste into the Seamless Donations fields shown above. Use the Live/Sandbox toggle to change modes, then click the Apps & Credentials button (3).
Let’s start by working in Sandbox mode first. It’s always good to having a working Sandbox mode where you can test without spending any money. Make sure the toggle (2) is set to Sandbox, and then click Apps & Credentials (3).
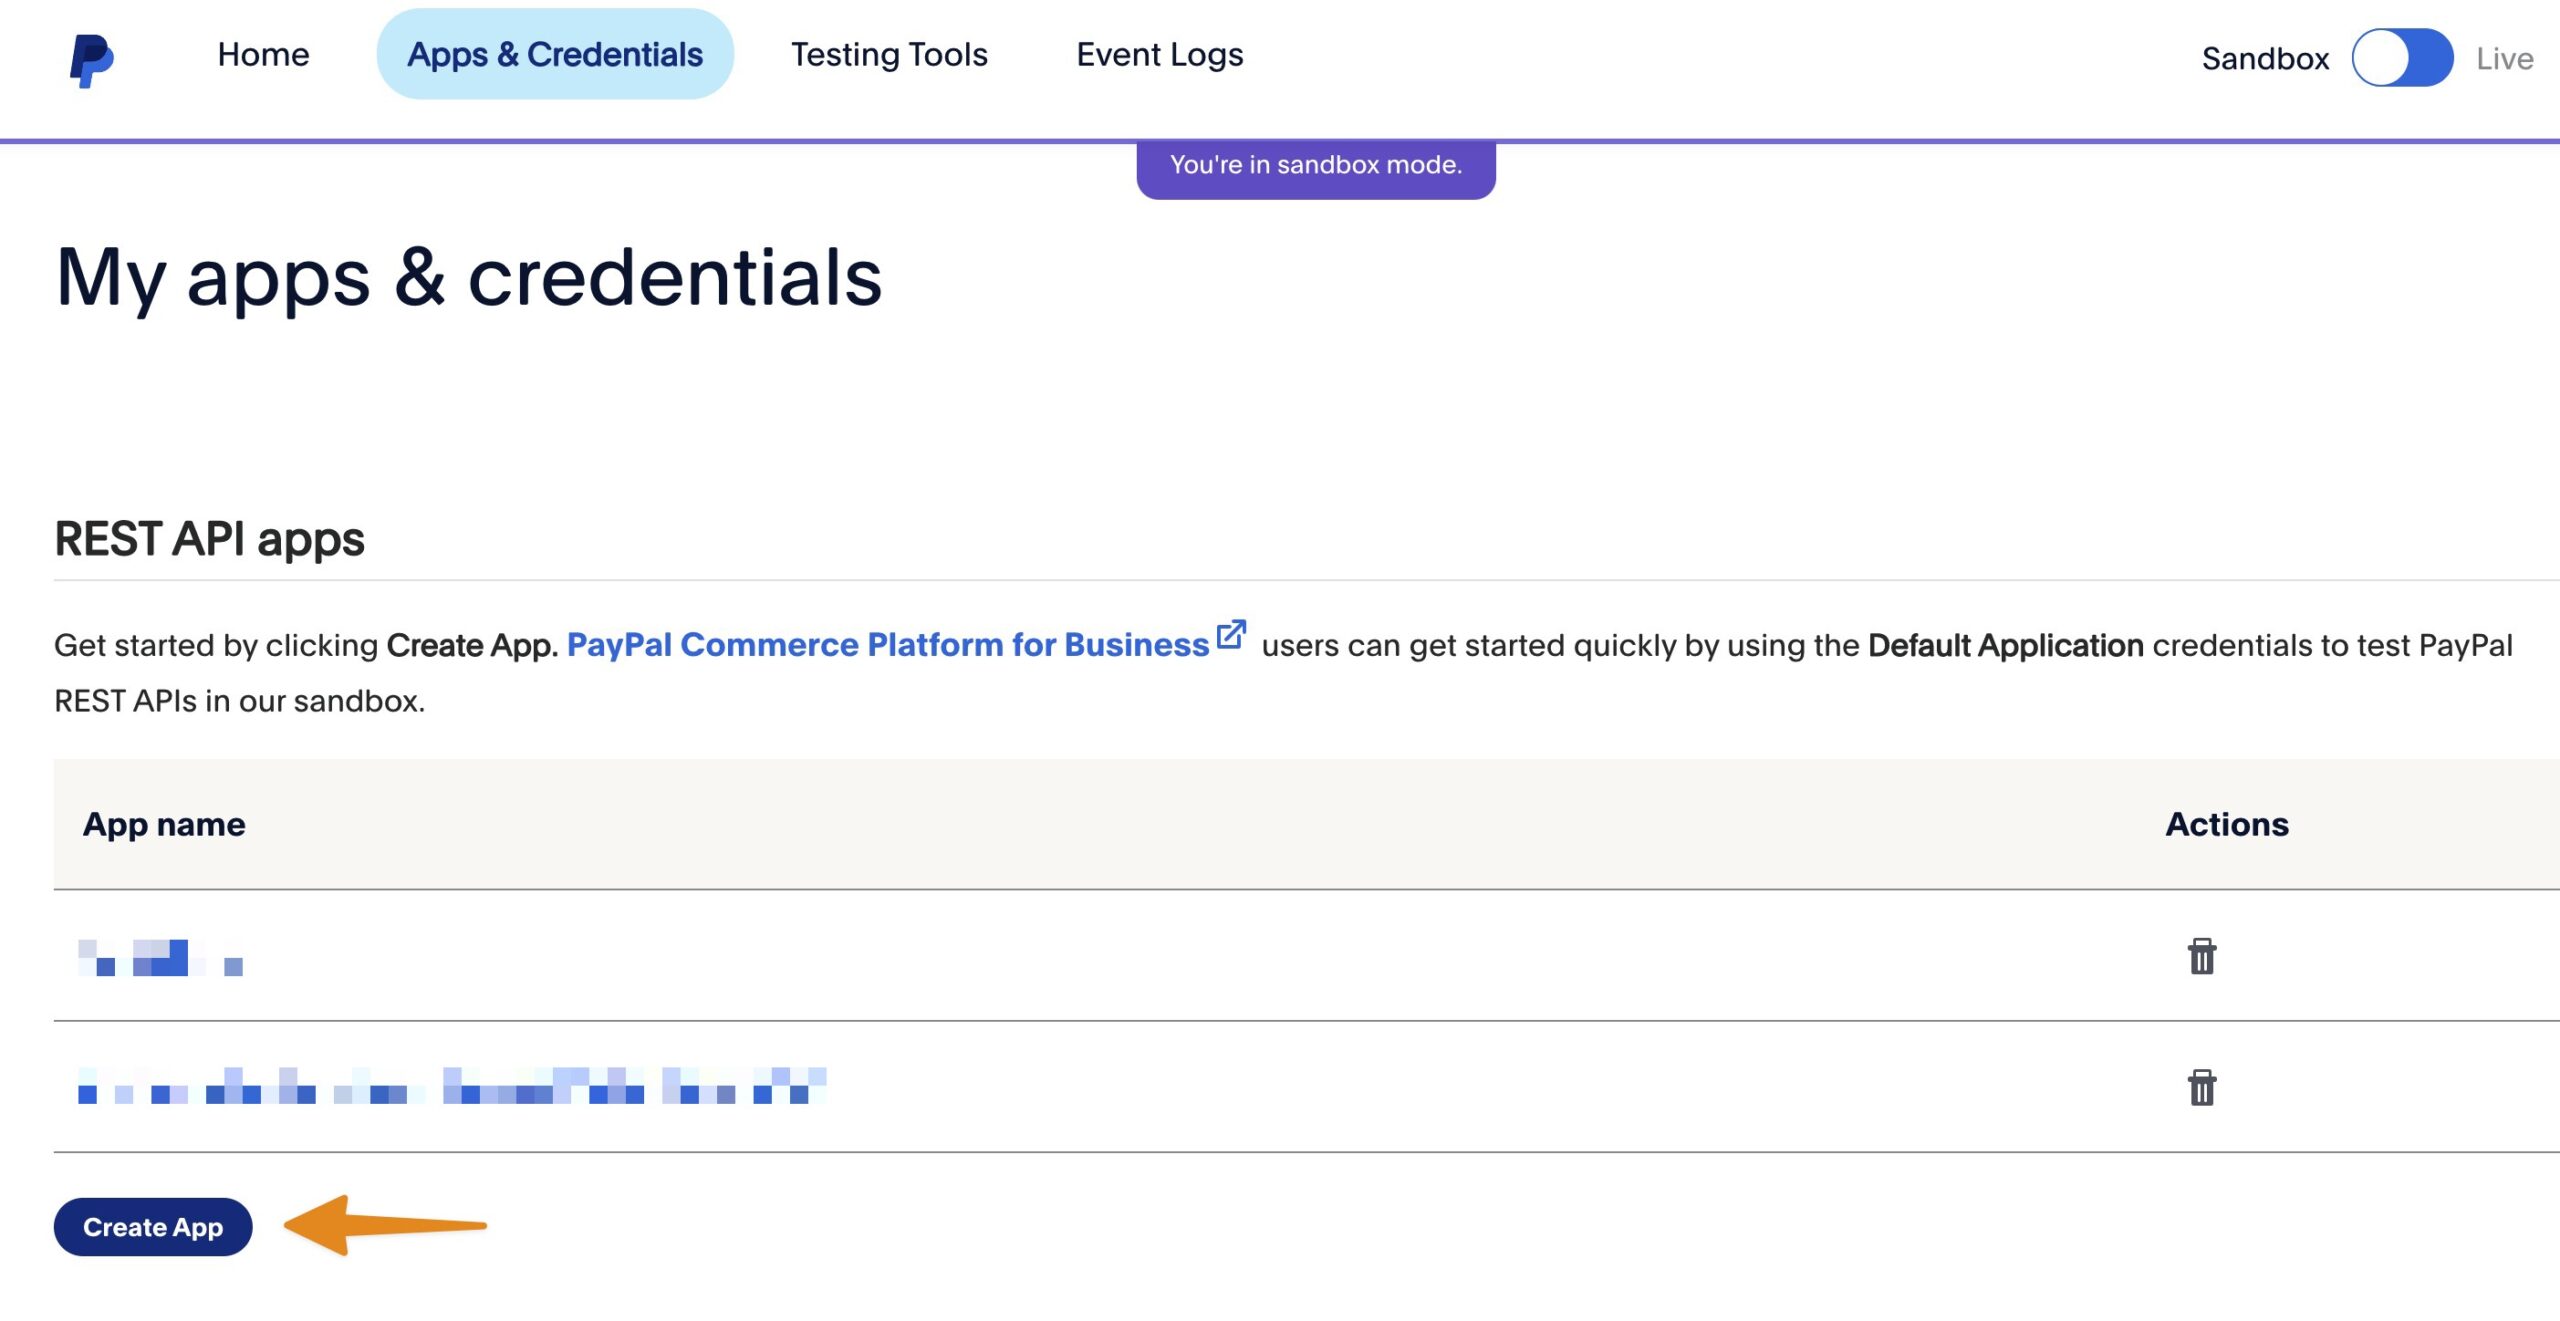
I already have two Sandbox apps defined. You probably won’t have any. In any case, you’ll want to create an app, which essentially tells PayPal that you want your website, running Seamless Donations to process payments via PayPal. Click the Create App button.
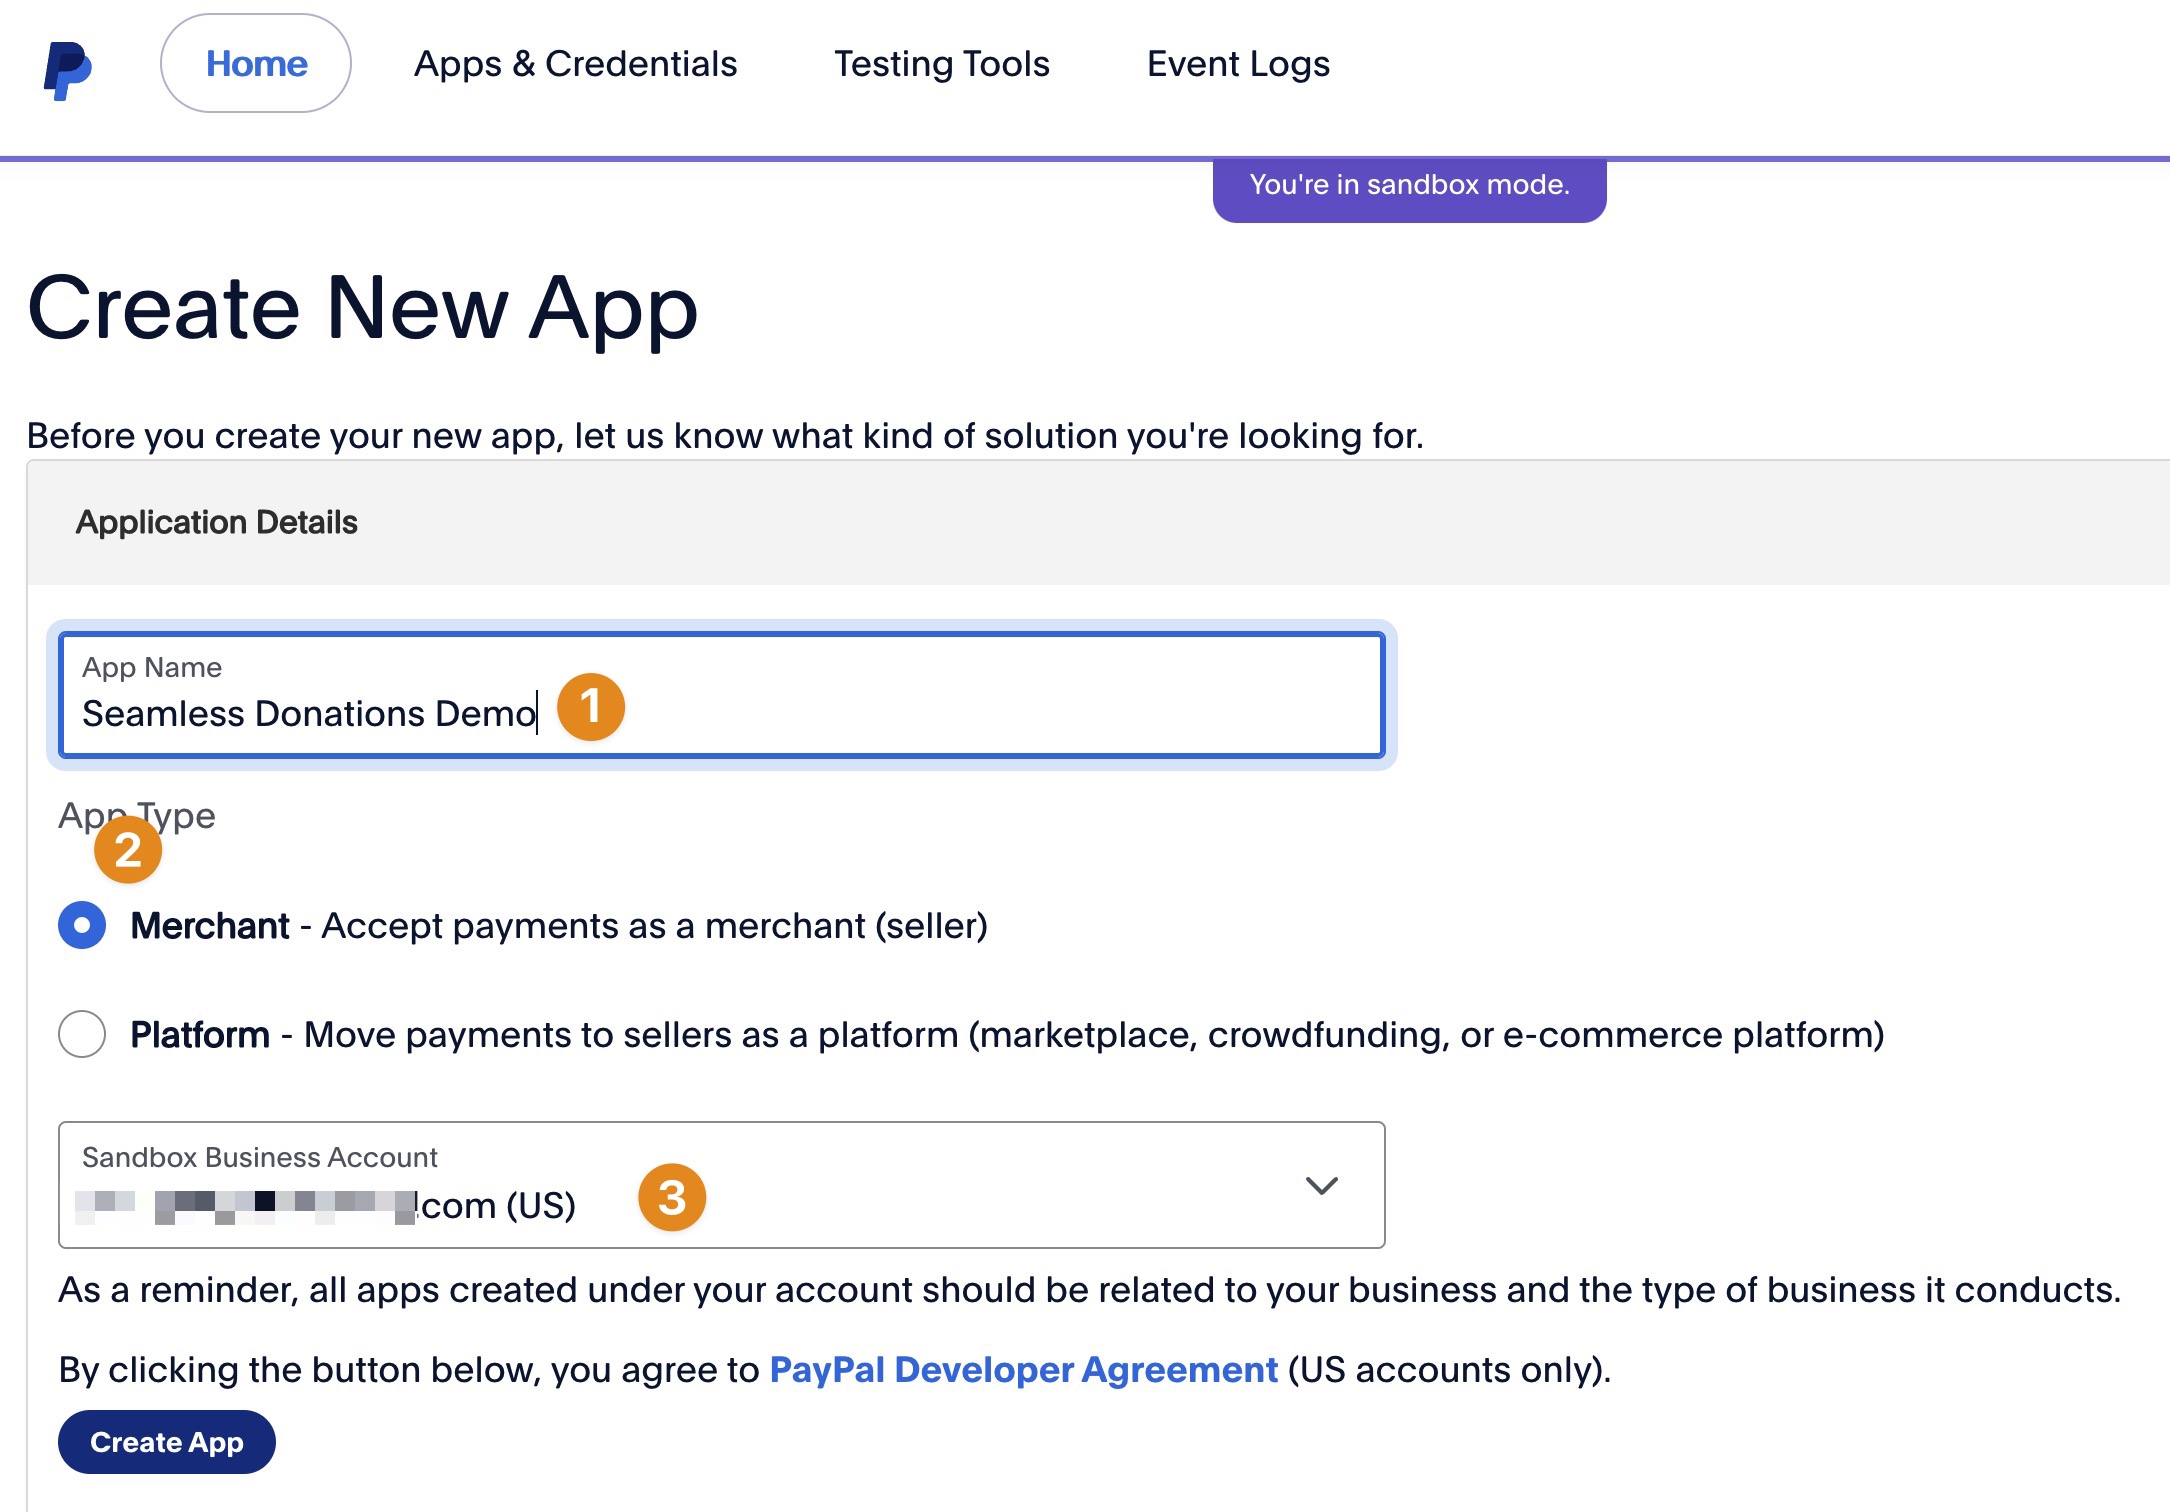
Here, you’ll want to name your app (1). That’s probably the name of your non-profit. You might want to append “Sandbox” to the app name if you’re running in Sandbox mode, but that’s optional. Next, make sure you select Merchant at (2). Do not select Platform. Finally, copy the Sandbox email address provided and record it somewhere safe.
Then click Create App.
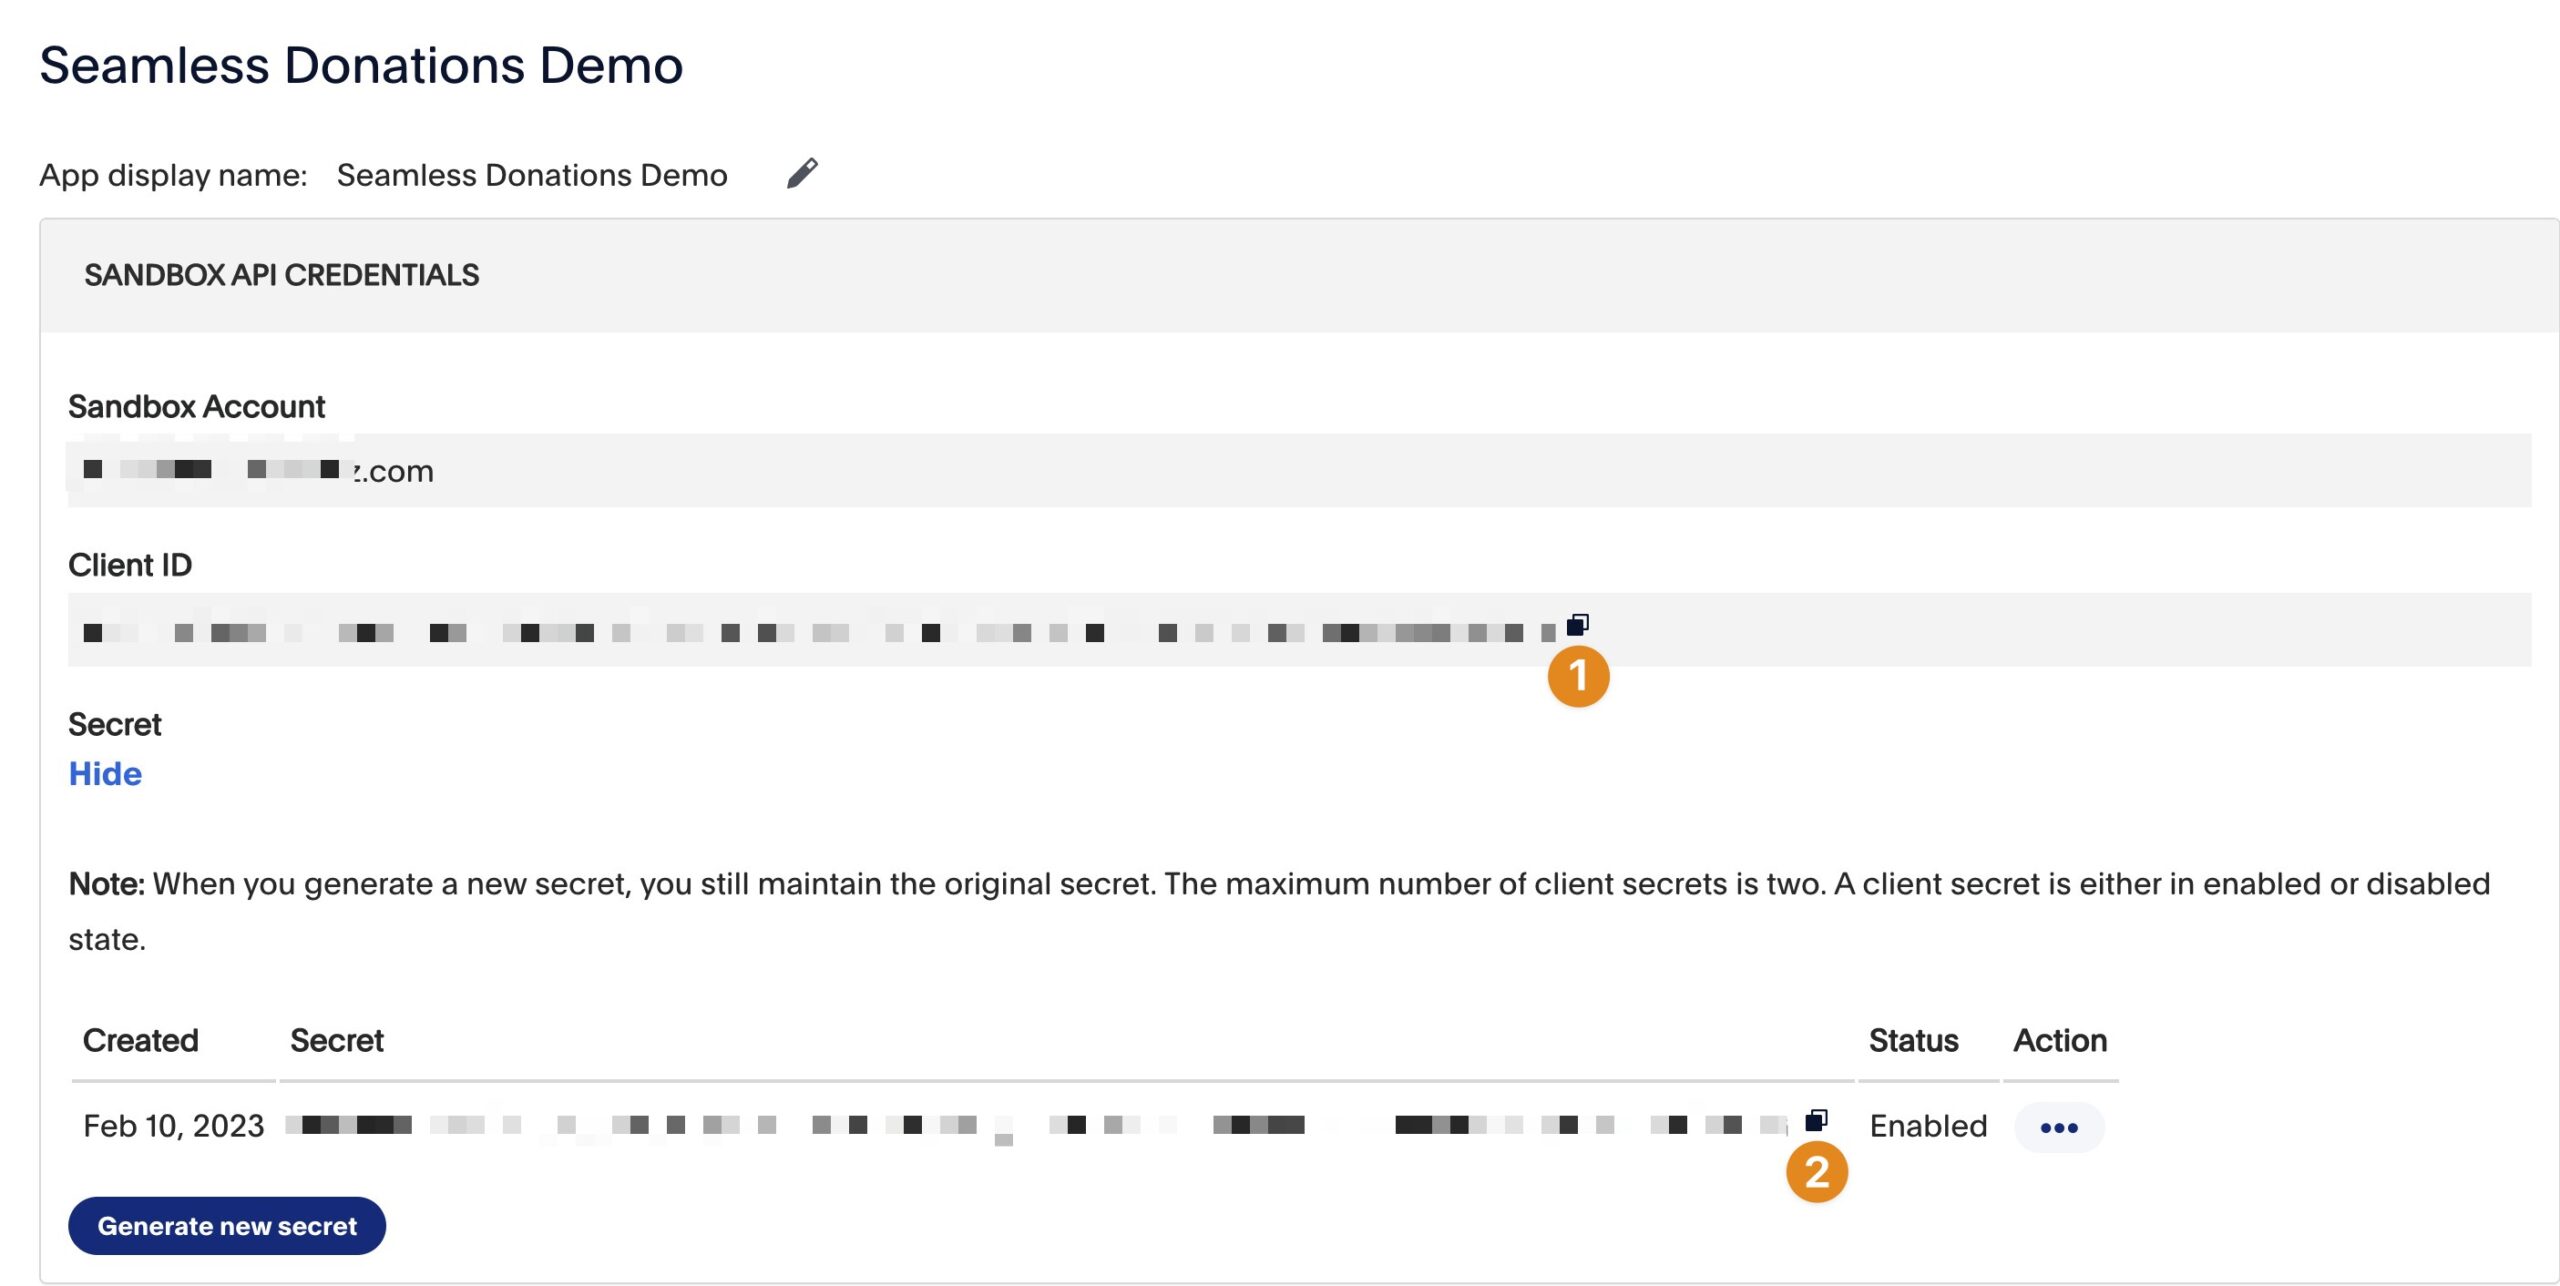
Now, here’s the stuff that’s really important. If you’re in Sandbox mode, copy the Client ID and the Secret ID into the Seamless Donations fields indicated for those IDs. Now, scroll down on this page. You’ll see this:
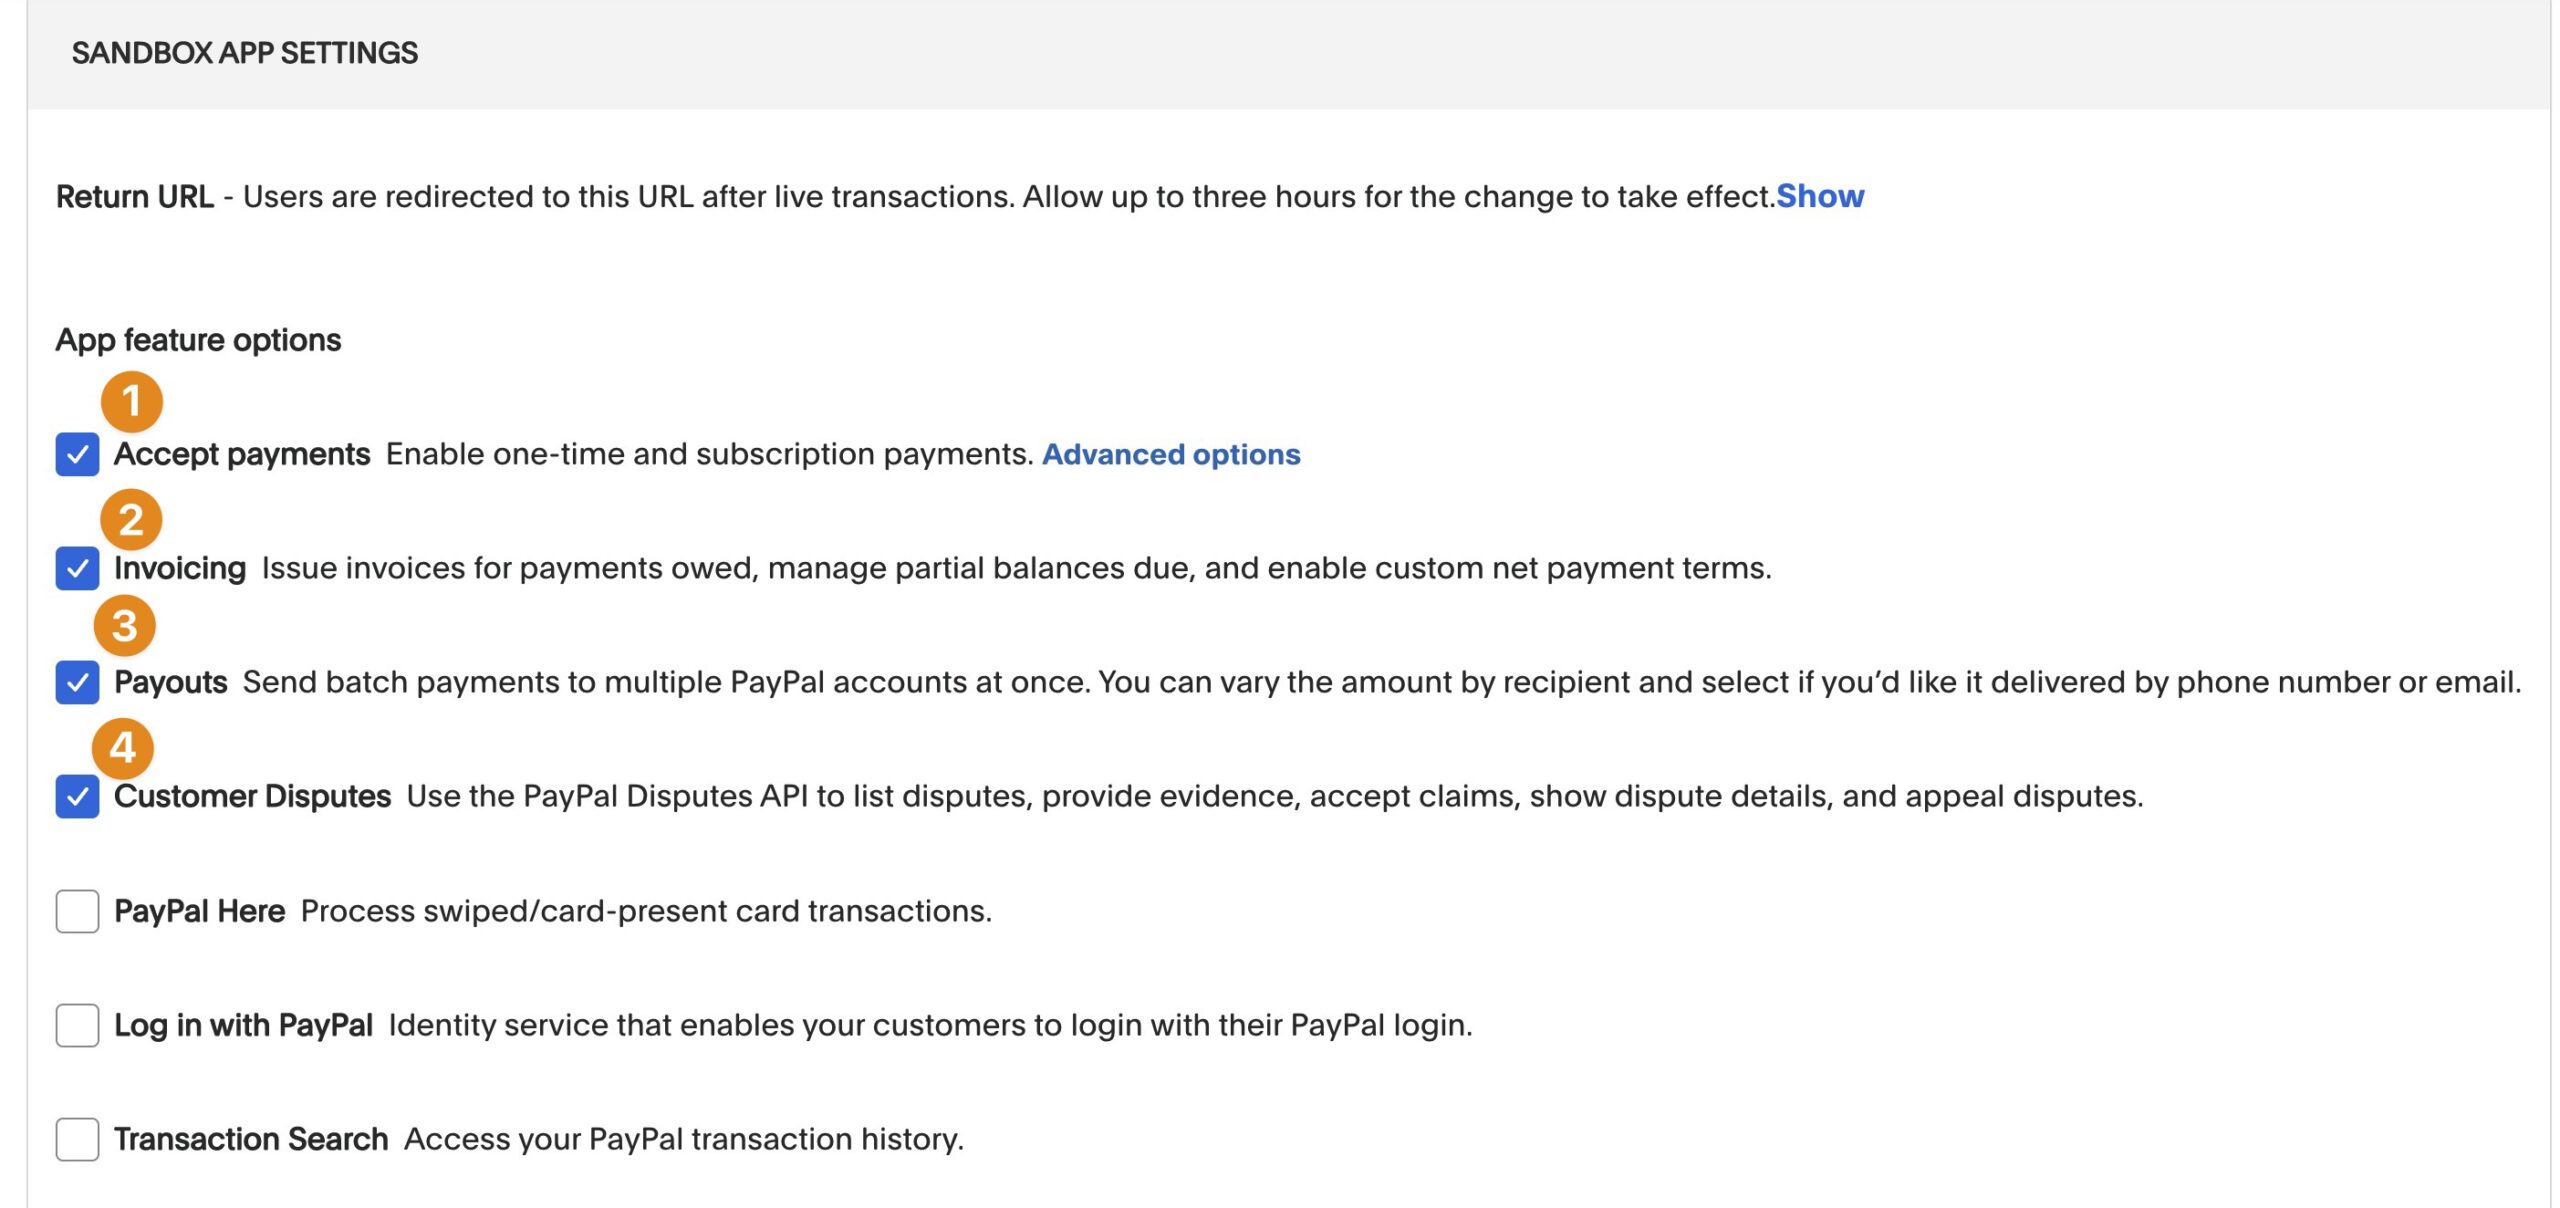
Make sure you screen matches the checkboxes above.
When you want to set up Live transactions, do the same with the toggle set to Live. There’s a little copy icon right next to where the (1) and (2) are shown that makes copying those IDs easier.
Getting your Sandbox account password
Recall you recorded your Sandbox email account earlier. You did that, right? Now, let’s go find its password. Back on the Developer Dashboard, scroll down until you see the Sandbox Accounts icon. Click it.

As you can see, I have a bunch of accounts, going back a while:
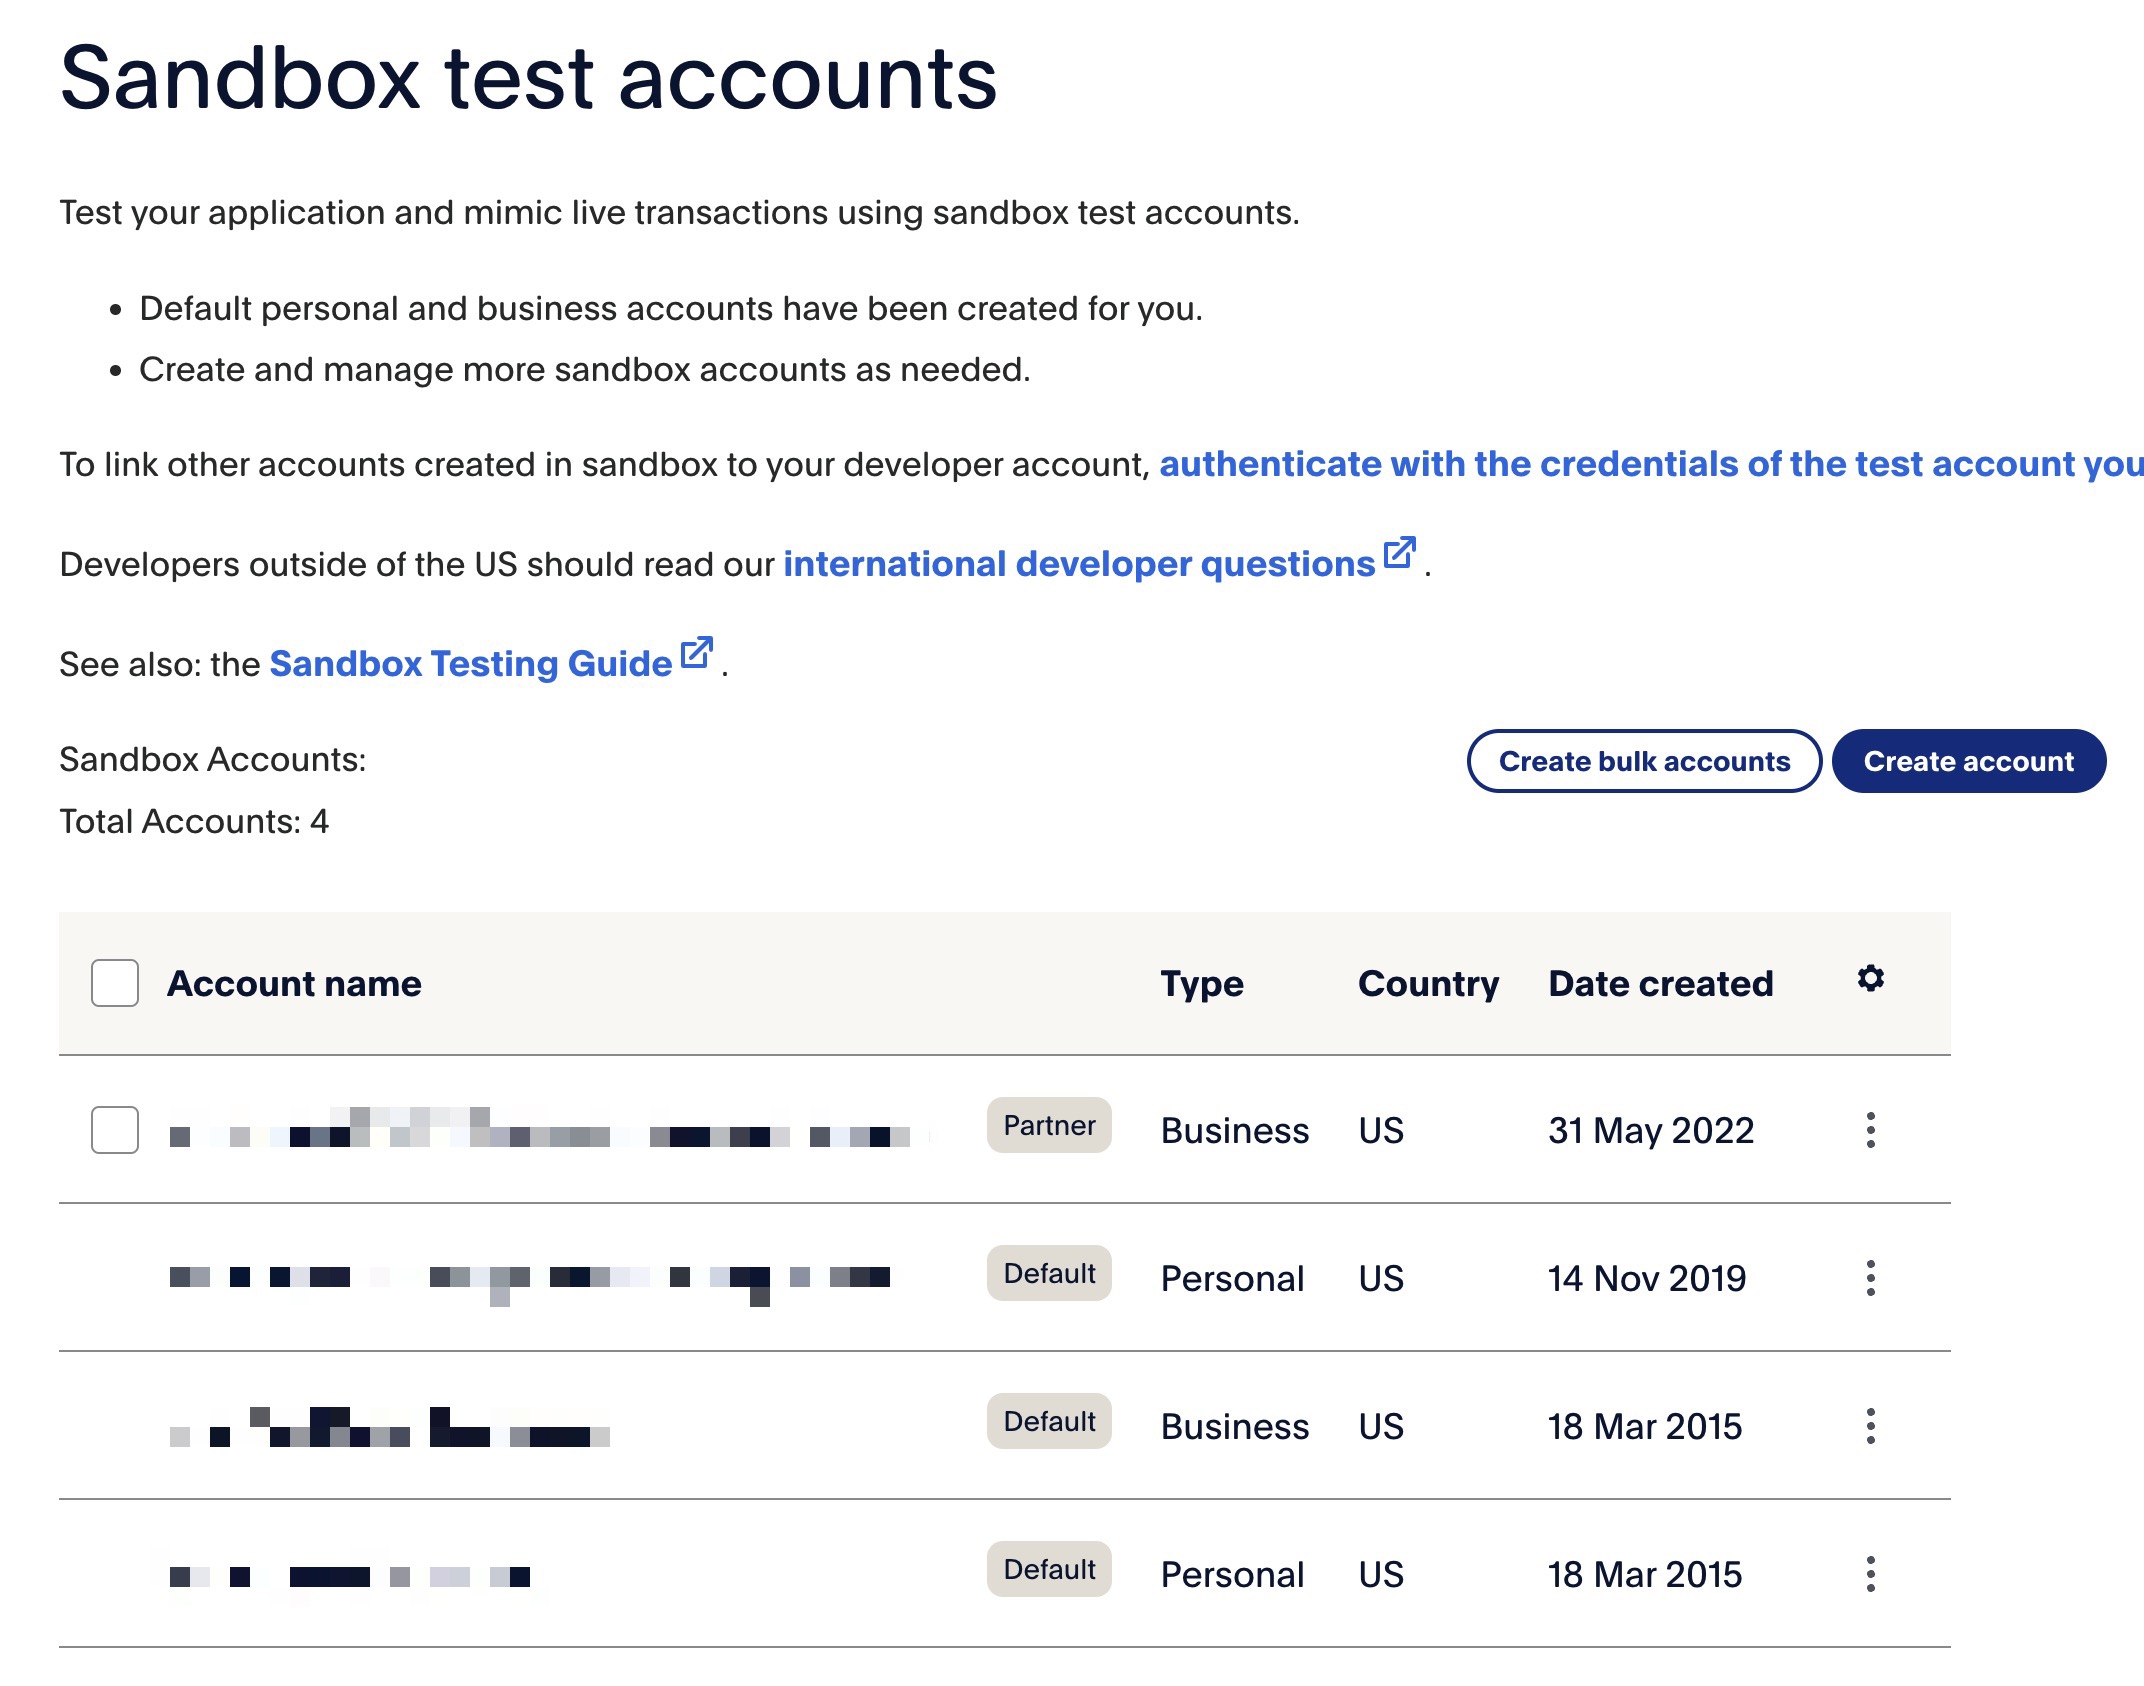
Notice the three dots next to each account:
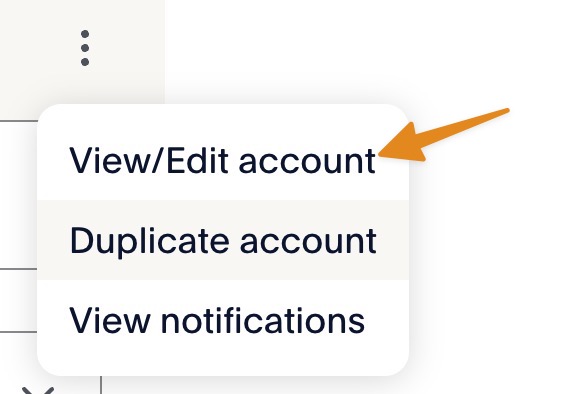
Click the three dots, then click View/Edit account. You’ll see this:
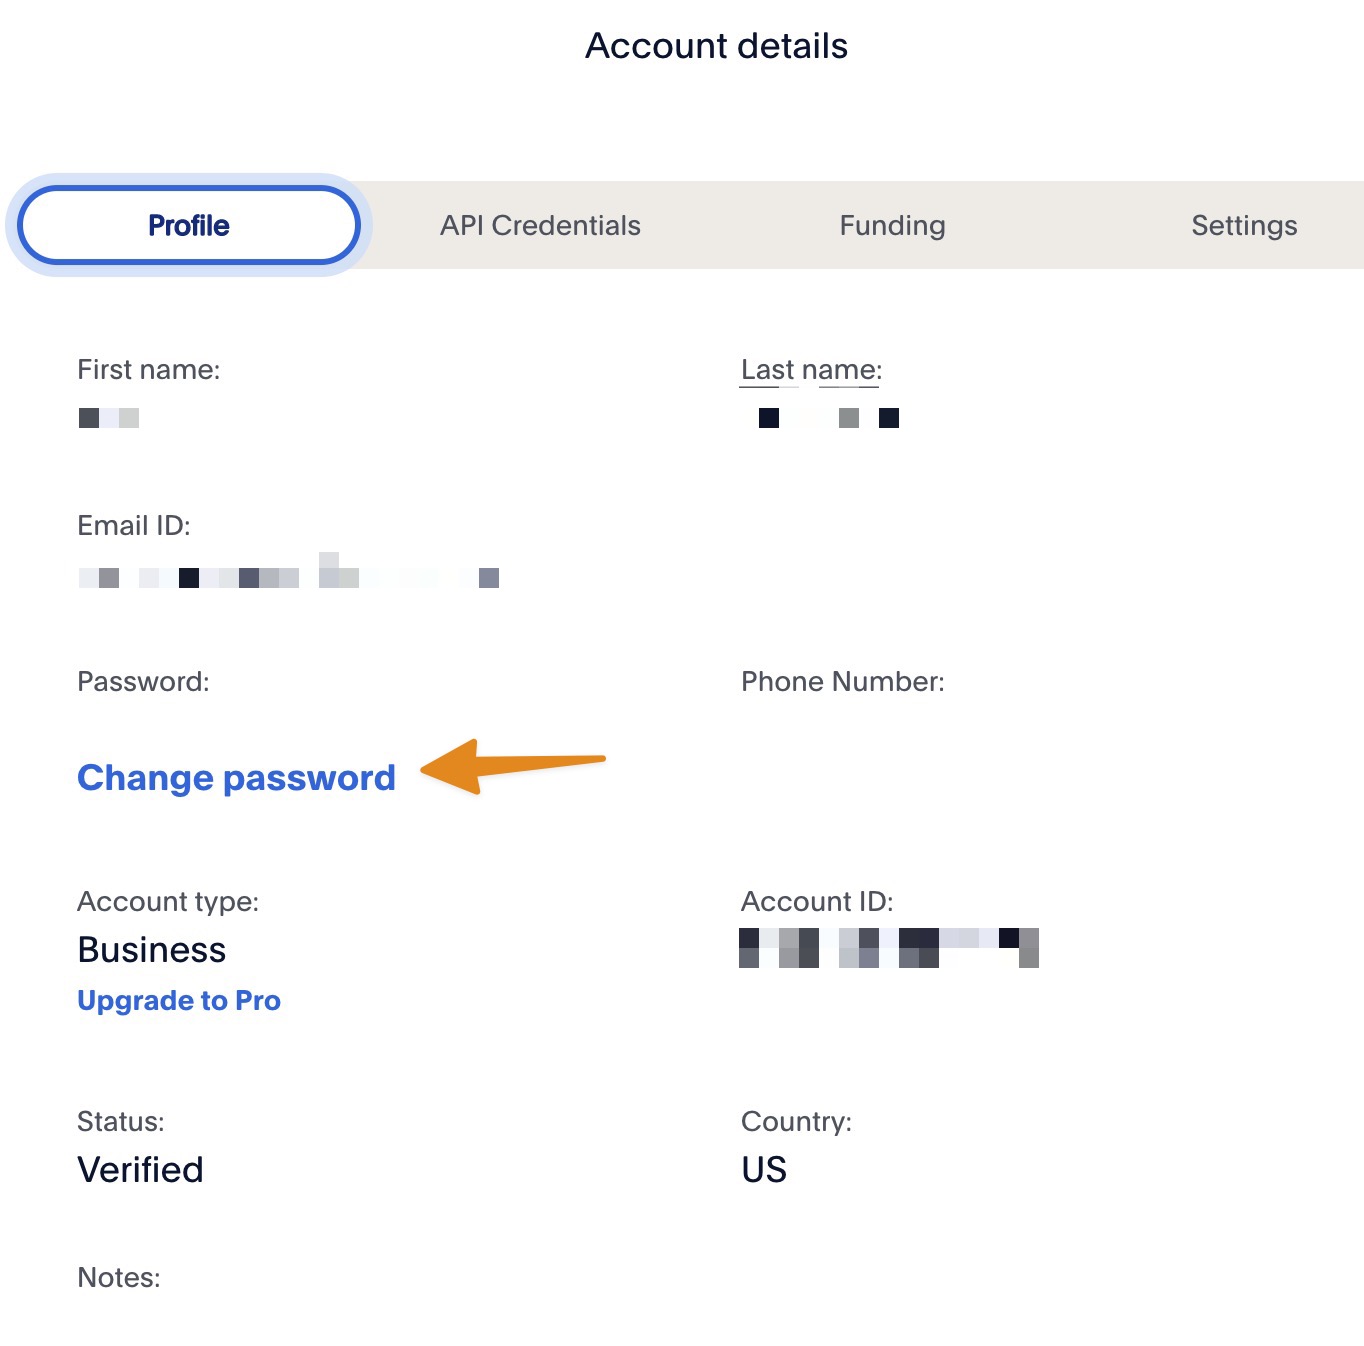
Go ahead and press that Change Password link and set your Sandbox account password. Then, go to your Sandbox dashboard and follow the directions above in the section Getting your Live and Sandbox merchant IDs to get your Sandbox merchant ID. Paste it in the Seamless Donations field as appropriate.
Save your Seamless Donations PayPal Checkout Settings
Back on the Settings tab in Seamless Donations, click the Save PayPal Settings button and you’re good to go.